
eCommerce is just commerce now.
Want to sell products or services? You need a presence on the internet. COVID-19 lockdowns have only made that more apparent. We’ve written a guide to the basics before.
That’s just a general guide, though. There are several ways to sell through Rainmaker Platform. In this State of the Platform, we look at one of the most popular options: WooCommerce.
People select WooCommerce for its simplicity, flexibility and ease of use. And it’s included with Rainmaker Platform Andromeda for no additional charge.
It might be intimidating when you’re first starting out, but we’re here to help. Here’s how to sell your first product on Rainmaker Platform with WooCommerce.
Types of Products
You can build many types of products with WooCommerce.
- Simple product: A standalone physical product: for example, a T-shirt.
- Grouped product: A collection of simple products grouped under one umbrella, but only for display purposes. For example: if you sold geeky T-shirts, you might make a collection of all your Star Wars merchandise in one place so it’s easier to shop.
- Virtual product: A virtual product is anything that doesn’t have a physical form. That could be an ebook, a home inspection service or a musical recording — it just can’t have shipping or inventory.
- Downloadable product: A downloadable product can be a virtual product, but it doesn’t have to be. Something like a textbook with access to downloadable virtual resources would fit under this category, as would a simple ebook.
- External/affiliate product: This is a product you’re selling, but you don’t own — often sold through an affiliate link.
- Variable product: This is a product with variations. Think of a T-shirt with multiple sizes and colors.
We’re going to start with a simple product. It’s the easiest to put together (hence “simple”) and doesn’t include some of the variables other products do.
Getting Started
We start by going to Global settings and enabling WooCommerce.
Once it’s on, we need to make sure we have a payment gateway set up. Rainmaker Platform supports Stripe, PayPal, Authorize.net and Braintree out of the box. From your dashboard, mouse over the gear icon (Settings) on the upper right. Click “Conversion.”
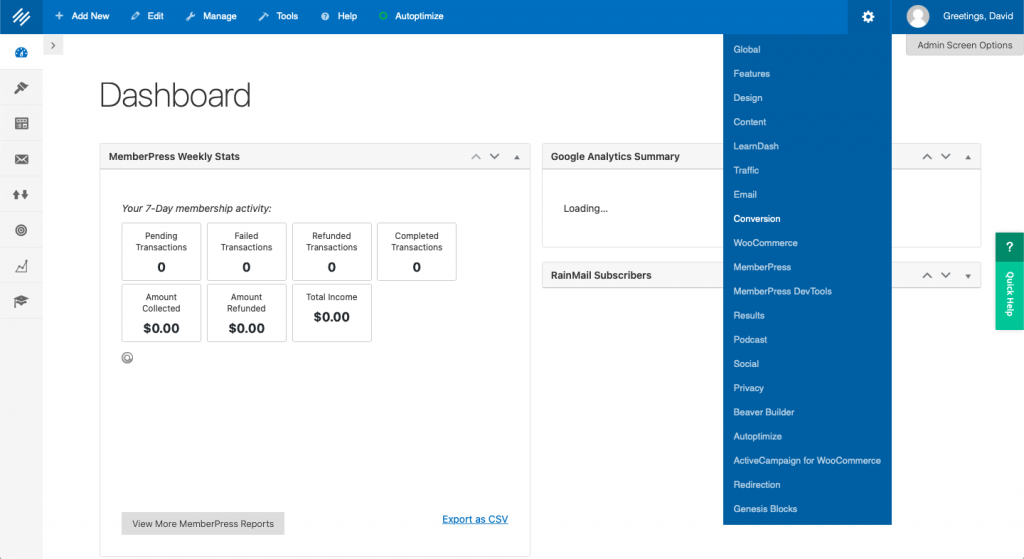
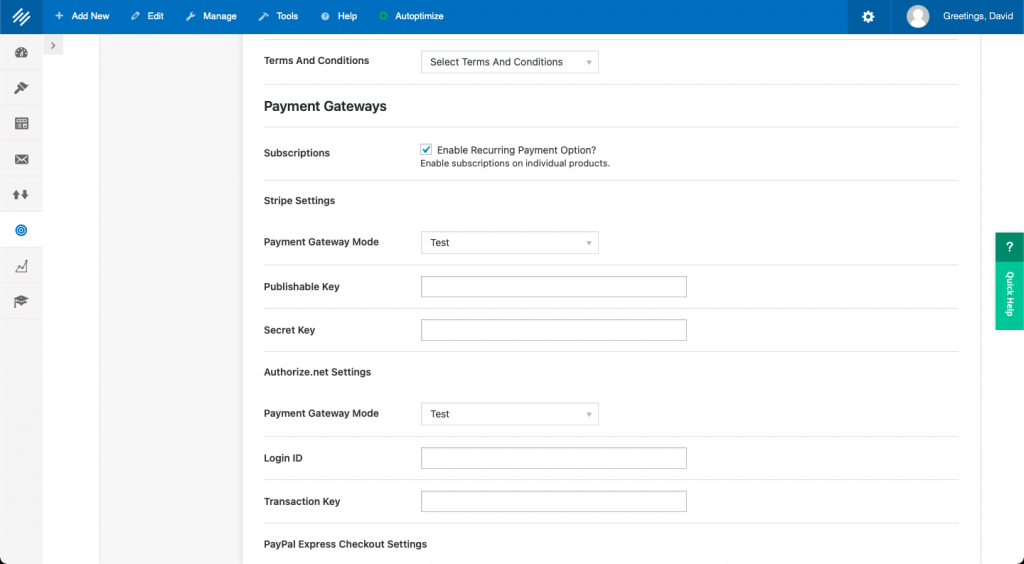
This will take you to the “Conversion” tab of your settings. Scroll down and you’ll see the payment gateway settings — you can find the correct information for this through your payment provider. Fill out the necessary fields, scroll to the bottom of the page and click “Save.”
Now we’re ready to add our new product. Click “Conversion” on the left-hand menu (it’s the symbol that looks like a bullseye), then scroll to the “WooCommerce” section and click “Products.”
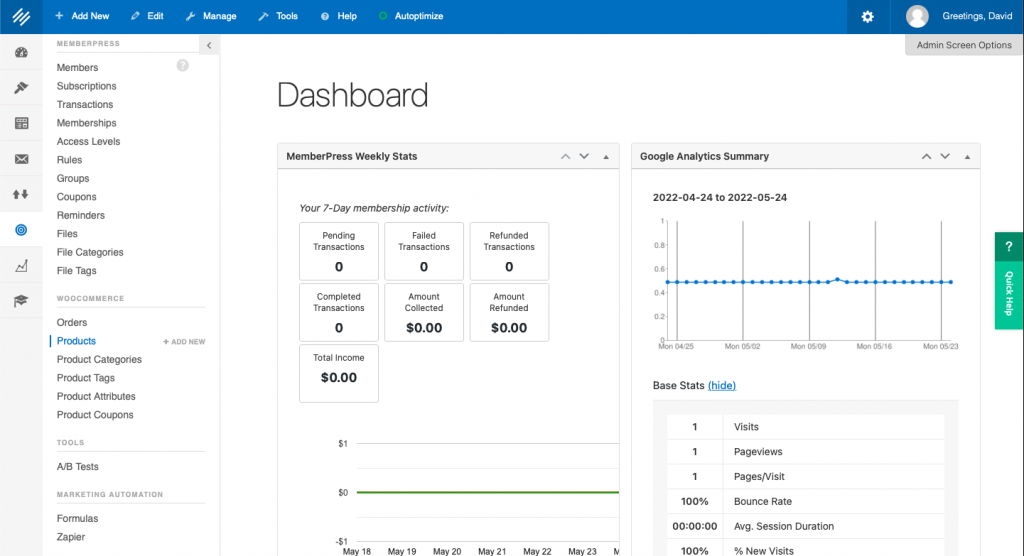
You may see different options on this menu depending on what features you have enabled.
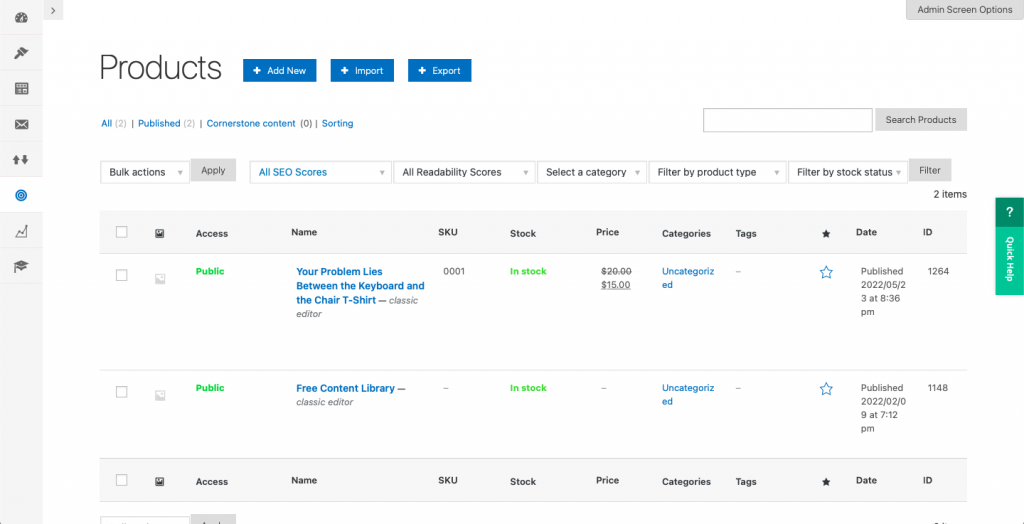
This will bring you to the “Products” page, where we’ll start building our new product.
Building A Simple Product
The Product page will list every product you have built in WooCommerce. From here, click “Add New” to build a product from scratch. You can also import or export products via .csv file. You can also duplicate products by mousing over the product name and selecting “Duplicate.”
Basic Information
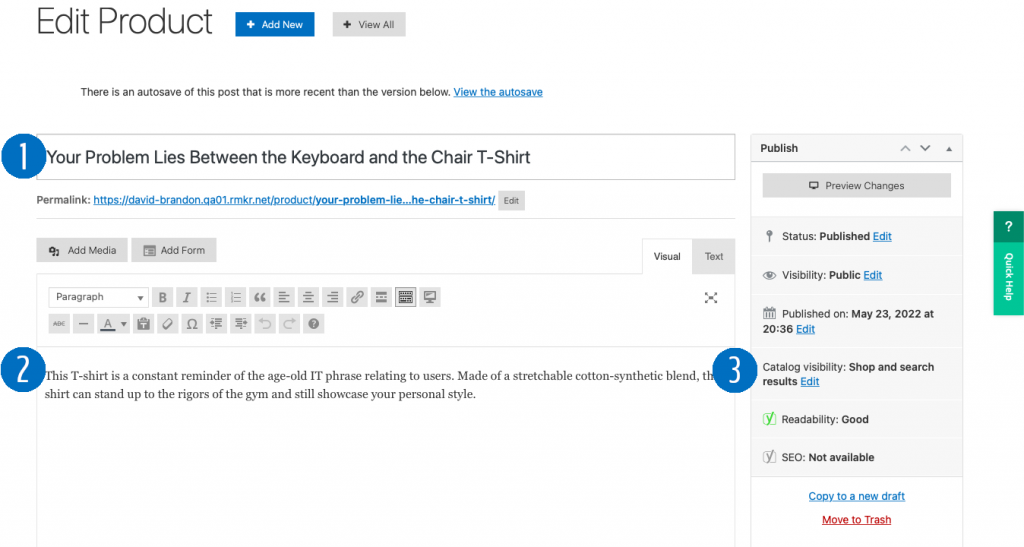
From the product edit screen, there are 3 sections we need to address:
The title (1) is the name of your product. It will show up as part of the page title and is visible as part of most SEO and link efforts.
The main description (2) is the first piece of copy the shopper will see. You can edit this just like you would a regular post with the built-in editor.
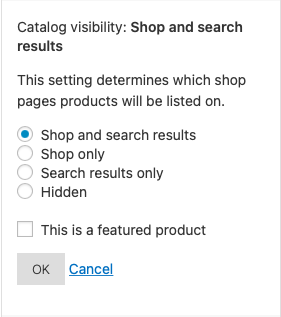
The catalog visibility (3) determines where this product will show up. You can choose from a few options here: both shop and search, shop only, search only and hidden. You can also feature a product — like the end cap at your local grocery store.
This information is all clearly visible at the top of the page. Scroll down the right side of the page (where you see the catalog visibility box) and you’ll find two other important settings: “Product Image” and “Product Gallery.”
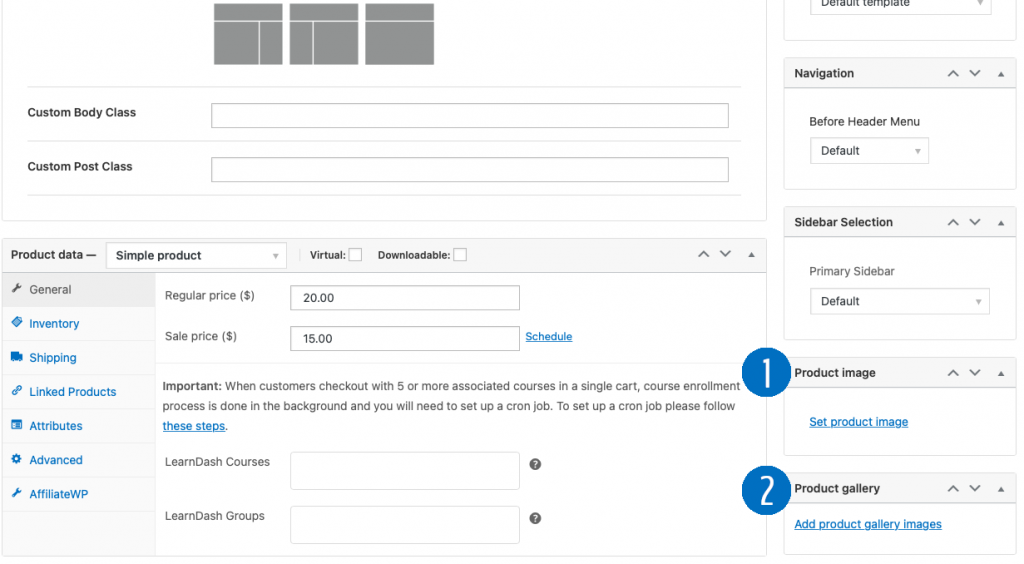
Product Image (1) is the main “hero image.” This is what people will see when they come to the page, and they’ll see it on catalog pages as well.
Product Gallery (2) is where you show off all the other images. These are critical — over two thirds of online shoppers say multiple camera angles are the most influential factor in their purchase decision. 22% of returns come from inaccurate photos. Two recommendations: Get quality images and add more than just one product image. Together, these boost conversions.
Now that you have all your basic information filled out, we can get into some of the more product-specific details with WooCommerce.
Detailed Product Information
As you scroll down the page, you’ll see a box labeled “Product Data.” This is where we’re going to start filling out the details on our product.
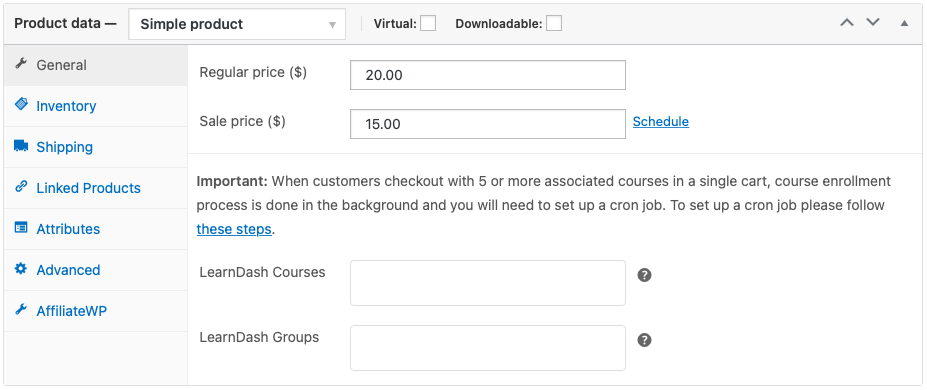
At the very top of the box, you can choose the type of product you’d like to sell. The space where it says “Simple product” is a drop-down box that lists all the types of products except for virtual and downloadable — these are options that can be applied with the check boxes.
This particular product page is set up to sell a T-shirt. Our regular price is our retail, and the sale price is only filled out if we’re running a sale. You can click the “Schedule” button to have this price go into effect at a scheduled date and time.
If you have those modules enabled, you will also see there are options to add LearnDash courses, and you can sell MemberPress memberships here too. We touched on this in our webinar on MemberPress a few months ago. Contact us if you want to integrate LearnDash or MemberPress with WooCommerce — we’ll help you get set up.
Click on each of the sections on the left side of this dashboard to fill out the rest of the details: “Inventory” (which includes a place to enter a SKU) and “Shipping.”
The “Linked Products” field lets you choose products to upsell and cross-sell with the product you’re building. This is a great way to get people to engage and buy more products. Cross-sell is a tried-and-true content marketing method, accounting for only 7% of visits but over a quarter of total revenue. You’ve probably seen a section on an eCommerce website that says “Customers like you buy” — that’s what this is.
We’ll come back to “Attributes” in a bit.
Now we can scroll down to the “Product short description” box. Fill this out with the information you want in the description. The first product information you filled out can be more general; it’s supposed to grab attention. Here’s where you can dig into the details.
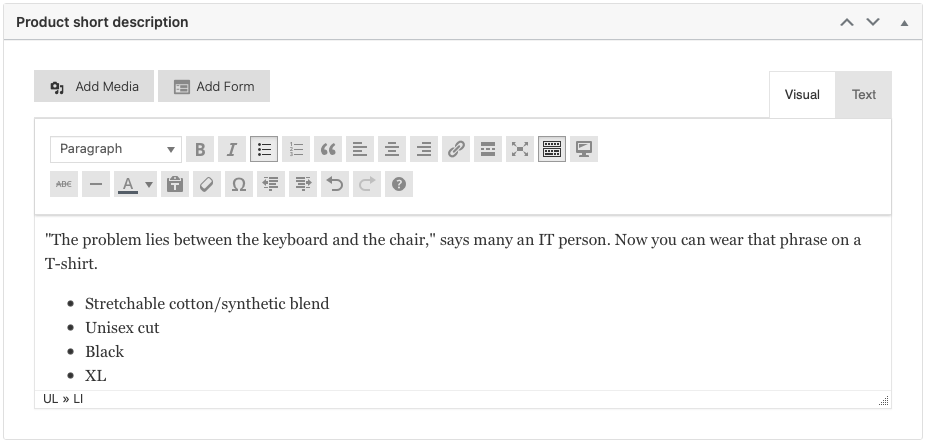
That’s all of our product information. Now we have to figure out our organization.
Organizing Your Products
WooCommerce has three important pieces of data that you can associate with every product: categories, tags and attributes.
Categories are groups of like items. By default, your storefront (catalog) shows all your categories laid out on a grid. Each category has its own landing page. These are broad groupings — for example, if you were running an apparel store you might have categories for T-shirts, hoodies, hats and socks. You can also add subcategories to further break it down — for example, ball caps and beanies under hats.
Categories have a very strict hierarchy. Tags do not. Tags simply let you note details about your products that don’t fit easily into a hierarchy. For example, if you ran a store that sold novelty clothing, you’d probably have a category for t-shirts. But you might use tags for “Star Wars,” “Star Trek,” and “Dungeons & Dragons.” You’d also have “Great Quotes” and “Custom Graphics.” You’d also tag “Luke Skywalker,” “Spock” and “Mario.” None of these fit neatly into a simple hierarchy — but they’re all qualities people will want to search for.
Attributes are very different to both of these. An attribute is used to differentiate products that have a lot of variants. If you sell a T-shirt, you probably sell it in multiple colors and sizes. You’d create an attribute for each color and size.
These can all be accessed under “Conversion” in the left-hand toolbar, the same place where you found the “Products” screen.
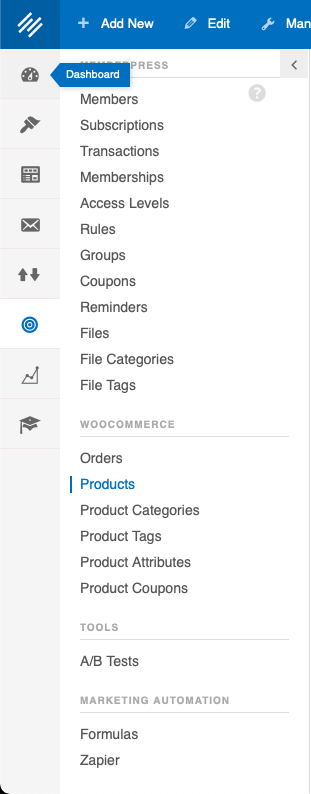
You can also access these settings from the product editing screen.
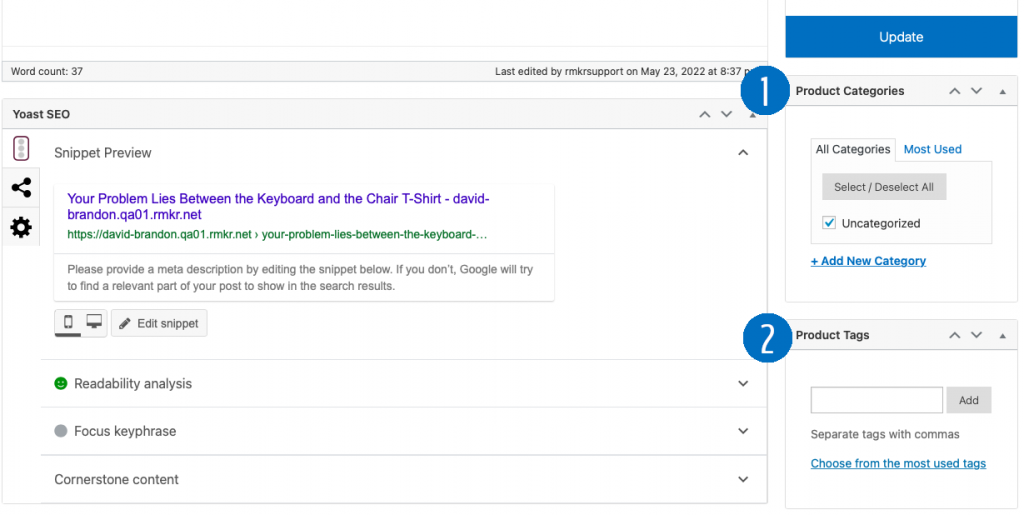
In the Product Categories (1) box, you can see that this product is in the “Uncategorized” category. By default, this is where every new product winds up. You can add new categories from this screen by clicking “Add New Category.”
The Product Tags (2) box will let you add tags by typing in the box, then clicking the “Add” button. You can also choose from a list by clicking the link below.
Attributes are added through the product data box you filled out earlier. Remember when we said we were coming back to the “Attributes” tab? Here it is.
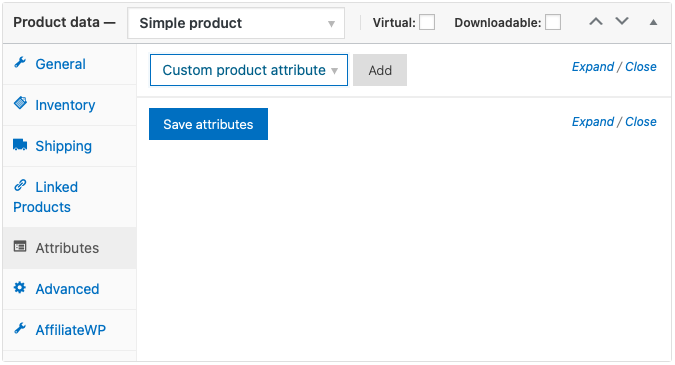
You can add or select attributes from those that already exist.
If you want to learn more about categories, tags and attributes, WooCommerce has an excellent walkthrough on their own site that goes into much more detail on how to manage them.
Make sure you fill all of these categories, tags and attributes out. They’re key to a well-organized, engaging shopping experience.
Once you have everything complete, click the “Publish” button.
That’s it. You’ve built a simple product.
You can replicate this process manually for each product, or you can copy it to a new draft by clicking “Copy to a new draft” above the “Publish” button.
Use eCommerce with Rainmaker Platform
Rainmaker Platform supports multiple eCommerce options, and WooCommerce is only one. We’ve barely scratched the surface here.
Want to learn more? We’ll take you through organizing a WooCommerce store in next month’s webinar on June 9 at 1 p.m. Central time. And if you have any questions about WooCommerce and your Rainmaker Platform Andromeda site, reach out. We’re here to help.
Best Regards,
David Brandon
Copywriter
Rainmaker Digital Services