July is here. We’ve just passed the mid-year mark; here at Rainmaker Digital HQ, we’re taking stock of the last six months, figuring out what worked and what didn’t, and preparing for the push to the end of the year. The second half always feels shorter than the first.
Looking ahead, we have upgrades to our podcast capabilities, integration of new payment options and new RainMail features in development for Rainmaker Platform. We’ll keep you up to date as those get closer to launch. In addition, our marketing and client services staff are working on new outreaches to our client base.
We’ve started simultaneously publishing our Dispatch articles to Medium at https://medium.com/@rainmakerdigital; if you’re already using Medium to stay up to date, follow us there to see the latest from the Dispatch. In addition, we’ve also been publishing to LinkedIn. Of course, you can also sign up for the Dispatch email list — but if you’re already using LinkedIn or Medium, you now have two more options to stay up to date with our latest news, tips and how-tos.
Right now we’re also running a promotion aimed at non-clients who have consulting businesses. If you know anyone who could use a site audit, please pass it on. We’d love to hear from them.
Finally, we’re working on a list of clients to spotlight in future articles and social media. If you’re interested in sharing your story and challenges and potentially being featured on RainmakerDigital.com, please reach out.
In the meantime, for the rest of this State of the Platform, we’re taking a look through the latest changes, then taking a quick look at payment gateways. Let’s dive in.
Rainmaker Platform Update 3.5.2
We released one update this month: version 3.5.2.
There were a couple of changes of note in this update, including adjusting the Braintree integration to make it easier to see when a payment fails and conform to the latest API standards. We also changed some settings for Ninja Forms field accessibility. See the changelog for more.
Payment Processing Starts Here
In order to process payments from a customer through your website — whether that be for a membership, digital product or service, or any other type of transaction — you need to have a payment gateway connected.
A payment gateway allows you to receive payment information from a purchaser and process the transaction. It handles the encrypted transfer of financial / payment information, acting as a trusted intermediary between business and buyer.
How Payment Gateways Work
As simple as an online transaction may seem, there are a number of parties that all get involved the moment you click “Buy.” These include:
- Payment processor: the company that processes the payments. Usually the provider of the payment gateway.
- Merchant: the seller
- Customer: the buyer
- Card issuer: the financial institution that created/owns the card. Citi, Chase, and Wells Fargo could all be card issuers.
- Acquirer: the financial institution responsible for processing payments on the merchant side. They route information to card schemes.
- Card scheme: the company connecting the card issuer with the acquirer to authorize the payment. Visa, Mastercard and American Express are well-known card schemes.
A payment gateway is the technology that allows all these parties to communicate with each other quickly and securely to verify and process the transaction. It’s difficult to take payments without using some sort of payment gateway to process the information.
There are four different payment gateways integrated with Rainmaker Platform, with pros and cons for each. You can see your settings for all of these gateways through your Rainmaker Platform Dashboard by going to the Settings gear icon > Conversion.
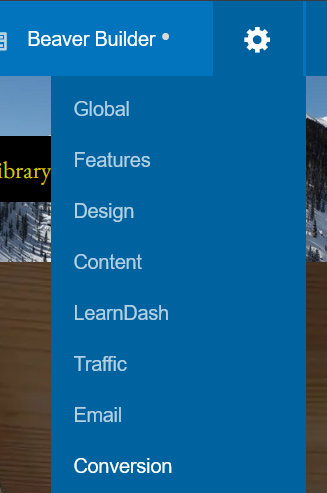
From here, you can access settings for all four payment gateways.
Stripe
Stripe is one of the most popular payment platforms in the world. Unlike many other payment options, it allows customers to save payment data (through its subsidiary link.com).When it comes to Rainmaker Platform, Stripe is the most used gateway. The Stripe payment widget will show up at the bottom of the sell page and allows the transaction to take place.
PayPal
PayPal is another popular payment option on Rainmaker Platform. The difference with this payment gateway is that unlike the others, when someone clicks on a link to pay with PayPal, they will be taken to PayPal itself to process the transaction. This allows for greater customer flexibility (since PayPal is handling the different types of payments on its end). A drawback to PayPal is that some customers may perceive your site as not as professional if PayPal is your only payment option. You can have multiple gateways active on the platform, so using PayPal as a “you can pay your way” option is a great way to meet every expectation.
Braintree
Braintree was bought out by PayPal and is now called “PayPal Enterprise Payments.” We’ve recently updated this integration for ease of use. Braintree only allows credit card payments through the website and does not support saving information for future payments, so it’s best used if you expect one-time purchases.
Authorize.net
Authorize.net is wholly owned by Visa and is one of the largest payment gateway solutions available, both online and offline. It is ideal for credit card payment processing. Similar to Braintree, it allows you to take payments via credit card, but doesn’t allow payment information to be saved.
Setting Up a Payment Gateway
There’s no “one size fits all” answer for which gateway to use. Often it will come down to what gateway you’re already using. However, Stripe and PayPal’s popularity and ease of use (as well as Stripe’s integration with many POS systems) make them the best options for most small businesses if you’re starting from scratch. Remember, though, you don’t have to choose one — you can use any number of them.
Every gateway will require a bit of setup to get started. You’ll need to create your account on that platform and enter all your information there, then copy and paste the payment credentials from your account to Rainmaker Platform’s Conversion settings page and save it. The process is different for each gateway, but each one includes four important components. Let’s look at Braintree as an example:
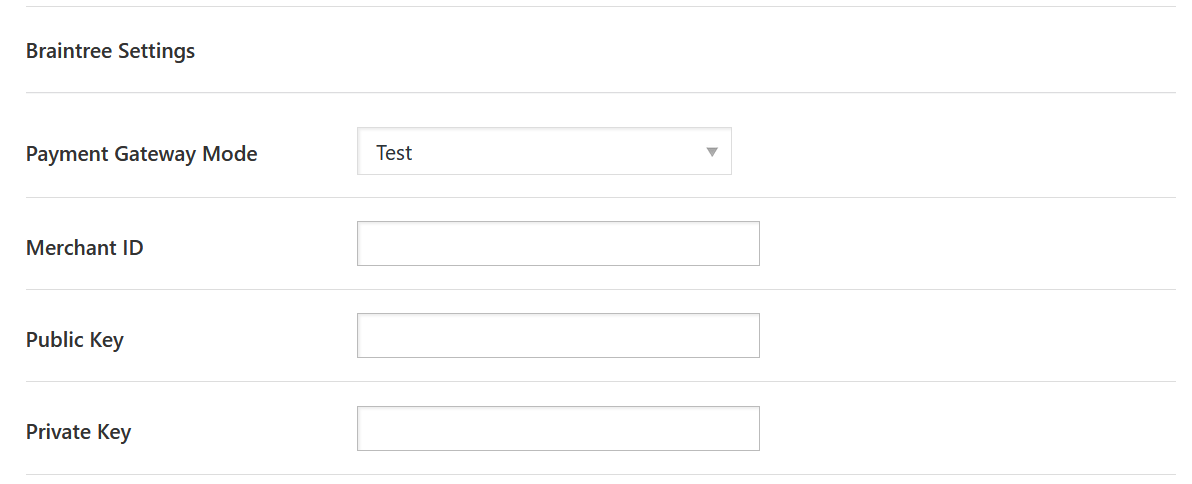
First you have the payment gateway mode; it has to be set to Live for any genuine payments to process. While you’re adding settings it should be set to Test.
Then you have some sort of unique ID or key which tells the payment gateway to use your account to process the payment. In various cases this may be the Merchant ID or Login ID.
Then you’ll have a couple of keys that are used to secure the payment. For Braintree, these are called the Public Key and Private Key; for other processors, they may have other names, but the idea is the same. This is a time-honored way of safeguarding two-way communications on the Internet.
Finally, you may have to add a URL — this is often used to take the user to a specific page or point out where a transaction should finish.
These are the broad strokes, but each gateway will be different. Check the Knowledge Base to see the process for your chosen payment gateway and follow the steps. If you run into issues, reach out to Support and we can guide you through the process.
Once you’ve set up your gateway, run a test transaction to make sure everything is working correctly (again, this process will differ depending on your provider, so check the Knowledge Base). When you’ve confirmed your gateway is set up correctly, you can set the mode to Live and start using it for all of your transactions — from memberships to courses to products.
If you want to make money from your website but haven’t started yet, start here. Choose one of these payment providers and set up your payment gateway. Start turning knowledge into profit. And if you don’t see an option here that you’d like to use, let us know. We’re always looking for more ways to help our user base. Just drop us a line, anytime.
Best Regards,
David Brandon
Copywriter
Rainmaker Digital Services